ByGilbert
How to Take a Screenshot on an HP Laptop Desktop
Capturing screenshots is a useful skill for anyone who works on a computer, whether for work, school, or personal projects. If you own an HP laptop and want to know how to take a screenshot on HP, you’re in the right place. This guide will walk you through the process step by step, making it easy for you to capture and save images of your screen whenever you need to.
Methods for Taking Screenshots on an HP Laptop Desktop
There are several methods you can use to take screenshots on an HP laptop desktop. Below, we’ll explore the most common and user-friendly options.
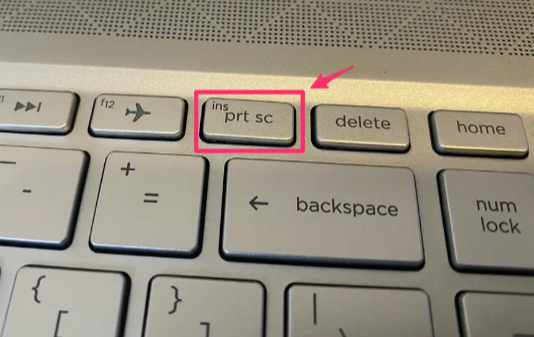
Using the Print Screen (PrtScn) Key
One of the simplest ways to capture a screenshot on an HP laptop is by using the Print Screen (PrtScn) key. Follow these steps:
Full Screen Screenshot:
- Press the PrtScn key on your keyboard. This captures an image of your entire screen.
- Open an image editing software like Paint or Microsoft Word.
- Paste the screenshot by pressing Ctrl + V.
- Save the image by clicking on File > Save As and choose the desired format (e.g., JPEG, PNG).
Active Window Screenshot:
- To capture only the active window, press Alt + PrtScn instead of just PrtScn.
- Follow the same steps as above to paste and save the screenshot.
Using the Snipping Tool
Windows operating systems, including those on HP laptops, come with a built-in tool called the Snipping Tool, which provides more advanced screenshot options.
Open the Snipping Tool:
- Type “Snipping Tool” in the Windows search bar and open the app.
Capture a Screenshot:
- Click on New in the Snipping Tool window.
- Drag the cursor to select the area you want to capture.
- Release the cursor to take the screenshot.
Save and Edit:
- After capturing the screenshot, you can annotate or highlight areas using the Snipping Tool’s editing options.
- Save the edited screenshot by clicking on File > Save As and selecting the desired format and location.
Using the Windows Key Combinations
Another quick way to take screenshots on an HP laptop is by using Windows key combinations:
Windows Key + PrtScn:
- Press Windows Key + PrtScn to capture a screenshot of the entire screen.
- The screenshot is automatically saved in the “Screenshots” folder within the “Pictures” directory.
Windows Key + Shift + S:
- This key combination allows you to capture a specific area of the screen using the Windows Snip & Sketch tool.
- After selecting the area, the screenshot is copied to the clipboard and can be pasted into an image editor or document.
Tips for Successful Screenshots on HP Laptops
Now that you know how to take screenshots on your HP laptop desktop, here are some additional tips to enhance your screenshot-taking experience:
- Useful Software: Consider installing third-party screenshot software like Lightshot or Greenshot for additional features and customization options.
- Organize Screenshots: Create a dedicated folder on your computer to store screenshots for easy access and organization.
- Editing Tools: Familiarize yourself with basic image editing tools to crop, resize, and annotate screenshots as needed.
- Keyboard Shortcuts: Learn and practice keyboard shortcuts for faster and more efficient screenshot capture.
Conclusion
Capturing screenshots on your HP laptop desktop is a straightforward process once you know the methods available. Whether you prefer using the Print Screen key, the Snipping Tool, or Windows key combinations, choose the method that suits your needs and workflow best. With practice, taking and managing screenshots will become second nature, enhancing your productivity and communication skills.